

The Authority in Global Agricultural Chemistry & Bio-Resources
Fish Hatchery Specification Comparison: Tanks, Flow Rate, Filtration, and Stocking Density
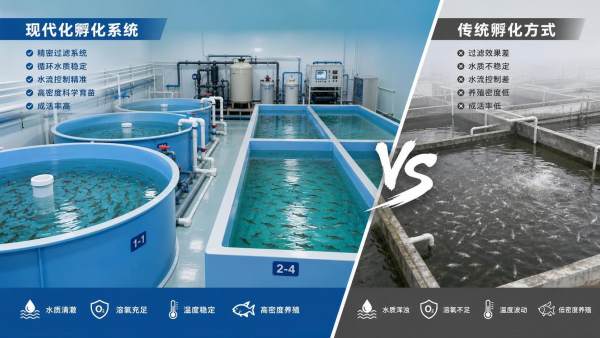
Fish Hatchery Specification Comparison: What Matters First
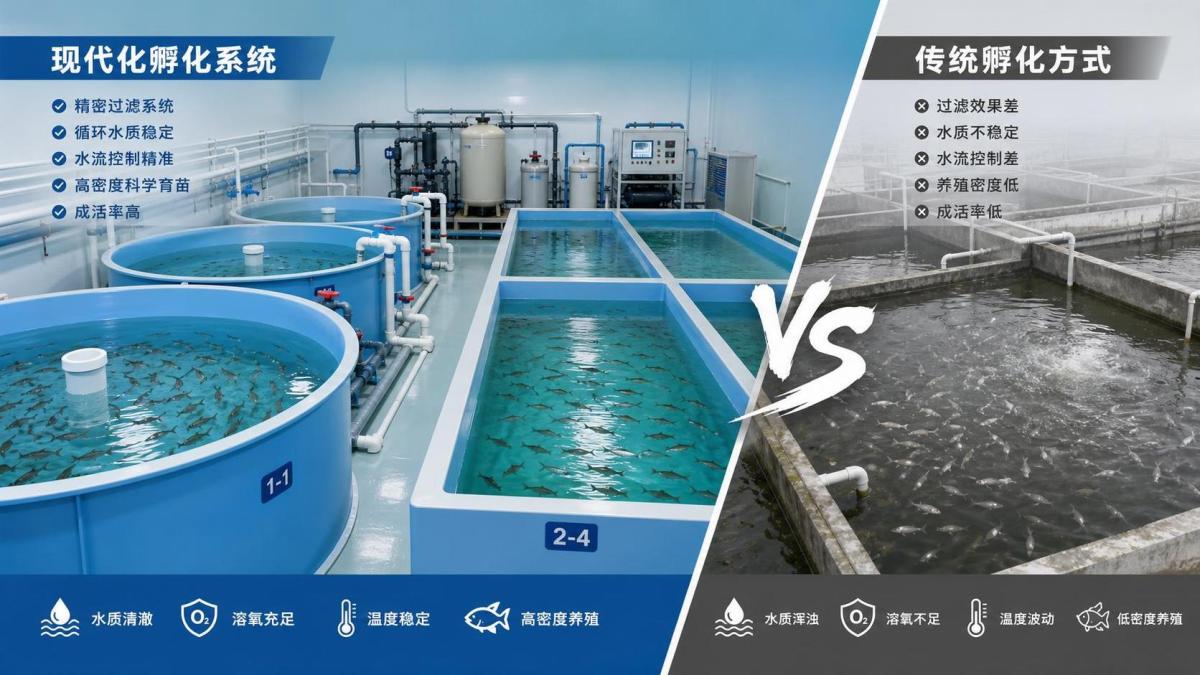
A reliable fish hatchery specification comparison is essential for project managers balancing capital cost, survival rates, and regulatory compliance.
From tank configuration and flow rate to filtration efficiency and stocking density, each design choice directly affects hatchery performance, biosecurity, and long-term operating stability.
This guide outlines the critical benchmarks and trade-offs decision-makers should evaluate before selecting or upgrading a commercial fish hatchery system.
In practice, a fish hatchery specification comparison is rarely about one component alone.
It is about how tanks, hydraulics, filtration, oxygen control, and biomass planning perform as one operating system.
That also means the best option on paper may underperform when site water quality, labor skill, or discharge rules are ignored.
A strong comparison framework reduces redesign risk, shortens commissioning time, and improves early-stage survival.
Start With Production Objectives
Before comparing hardware, define the biological target.
Species, life stage, annual output, mortality tolerance, and harvest size shape every technical requirement.
A fish hatchery specification comparison for salmon fry differs sharply from one for tilapia fingerlings or marine larvae.
The water source matters just as much.
Groundwater, surface water, seawater, and recirculating systems impose different filtration loads, temperature constraints, and disease exposure profiles.
At this stage, shortlist systems using five decision filters:
- target species sensitivity to turbulence and handling stress
- required daily egg or fry throughput
- site water availability and seasonal variability
- effluent standards and local permit conditions
- operator capacity for monitoring and maintenance
Tank Configuration in a Fish Hatchery Specification Comparison
Tank geometry sets the tone for water movement, waste capture, grading ease, and fish welfare.
This is one of the first areas where a fish hatchery specification comparison becomes concrete.
Round tanks usually provide better self-cleaning flow patterns.
They are often preferred for fry and fingerling systems where suspended solids must move quickly toward the center drain.
Rectangular tanks can improve space efficiency and simplify modular building layouts.
However, dead zones and uneven velocity profiles need closer hydraulic design.
For hatchery trays and early incubation units, access and hygiene may matter more than tank shape alone.
Key tank criteria to compare
- usable volume versus gross volume
- drain design and solids removal efficiency
- internal surface smoothness and cleanability
- material resistance to UV, salt, and disinfectants
- access points for netting, grading, and observation
In a serious fish hatchery specification comparison, tank material should also be checked against lifecycle cost, not just purchase price.
Flow Rate: The Most Misread Parameter
Many buyers compare nominal flow capacity without asking how that number was derived.
That creates risk during scale-up.
A useful fish hatchery specification comparison should separate total system flow from tank turnover rate, inlet velocity, and emergency redundancy.
Adequate flow rate protects dissolved oxygen, temperature uniformity, ammonia dilution, and solids transport.
Too much velocity, however, can stress delicate life stages and increase energy use.
Questions worth asking suppliers
- What turnover rate is recommended for each species and growth stage?
- Is the design based on peak biomass or average biomass?
- How is flow distributed across parallel tanks during partial loading?
- What happens during pump failure or power loss?
- How much head loss is expected after filters begin loading?
From a decision standpoint, flow rate should always be connected to oxygen demand and waste production.
Looking at flow alone gives a weak fish hatchery specification comparison and can hide operating bottlenecks.
Filtration Efficiency and Biosecurity Trade-Offs
Filtration is where water quality control and compliance often meet.
In a fish hatchery specification comparison, mechanical and biological stages should be reviewed together.
Mechanical filtration removes suspended solids before they break down and raise biological oxygen demand.
Biological filtration converts toxic ammonia into less harmful nitrogen compounds.
Disinfection units such as UV or ozone add another layer, especially in recirculating aquaculture systems.
Core filtration benchmarks
- solids capture size and removal rate
- biofilter media surface area and loading capacity
- backwash water consumption
- cleaning frequency and labor demand
- pathogen control performance under real flow conditions
More filtration is not always better.
Overcomplicated treatment trains can increase downtime and operator error.
The strongest fish hatchery specification comparison checks how easily each stage can be monitored, isolated, and serviced.
Stocking Density: Capacity Versus Survival
Stocking density is often presented as a headline capacity number.
Yet in a fish hatchery specification comparison, density only makes sense when linked to oxygen transfer, waste removal, and feeding behavior.
Aggressive density assumptions may reduce building footprint, but they can also increase grading frequency, fin damage, and mortality spikes.
That is especially true during temperature swings or disease events.
When reviewing density claims, verify these points
- density basis in kg per cubic meter or fish per tank
- species-specific welfare threshold
- feeding regime and feed conversion assumptions
- minimum dissolved oxygen at maximum biomass
- harvest timing and partial thinning strategy
A realistic fish hatchery specification comparison favors stable production over theoretical peak occupancy.
How to Compare Vendors on a Like-for-Like Basis
Vendor proposals often look similar until assumptions are unpacked.
A disciplined fish hatchery specification comparison should normalize the same operating conditions across all bids.
Recent procurement trends show more buyers requesting performance guarantees tied to survival, water quality, and energy intensity.
That makes the fish hatchery specification comparison process more evidence-based and less dependent on brochure claims.
Final Decision Framework
A practical fish hatchery specification comparison should end with a weighted decision matrix.
Capital cost matters, but it should not outrank biological stability and maintainability.
In most commercial projects, the most expensive mistakes come from undersized hydraulics, weak solids control, and unrealistic density assumptions.
A balanced decision usually favors systems with transparent design data, accessible maintenance points, and clear operating envelopes.
Before issuing a final purchase decision, confirm pilot data, reference installations, spare parts access, and commissioning support.
That step often reveals whether a polished proposal can hold up in real operating conditions.
The most useful fish hatchery specification comparison is one that connects engineering numbers to survival, compliance, and operating discipline.
Use that lens, and the final system choice becomes clearer, more defensible, and far easier to scale with confidence.
Related Intelligence
- RAS SystemsSustainable Aquaculture Practices That Cut Feed Waste and Protect Fish Farm Water QualitySustainable aquaculture for fish farms: reduce feed waste, protect water quality, and build resilient, efficient systems with practical strategies.
- RAS SystemsDrum Filter System Price: How Flow Rate, Micron Rating, and Automation Affect CostDrum filter system price depends on flow rate, micron rating, automation, materials, and lifecycle costs. Compare quotes confidently and choose the right system.
- RAS SystemsHow to Specify Large-Scale Fish Farming Equipment for High-Output RAS ProjectsLarge scale fish farming equipment guide for high-output RAS projects—specify tanks, filtration, oxygen, automation, and redundancy for reliable growth.
The Morning Broadsheet
Daily chemical briefings, market shifts, and peer-reviewed summaries delivered to your terminal.